Every patch has a story. It begins with a moment in nature. It ends with a beautifully designed piece ready to personalise your clothes or accessories. In this blog, I’ll take you behind the scenes of my creative process. This includes everything from freehand embroidery to digitising and replicating my designs.
Every patch starts with a spark of inspiration. Whether it’s a vibrant flower I’ve seen on a walk or a design element from my existing collection. I start by thinking about the patch’s purpose.
• What will it pair well with?
• What feeling or story will it tell?
Once I have a clear vision, it’s time to bring the idea to life.
Freehand machine embroidery is where the magic begins – and my favourite part of the process. It’s a slow but freeing process that allows me to infuse each patch with character and individuality. To me it’s like painting, with thread. The sewing machine being my paint brush. Here’s how it works:
I set up my embroidery hoop with wash-away stabiliser.
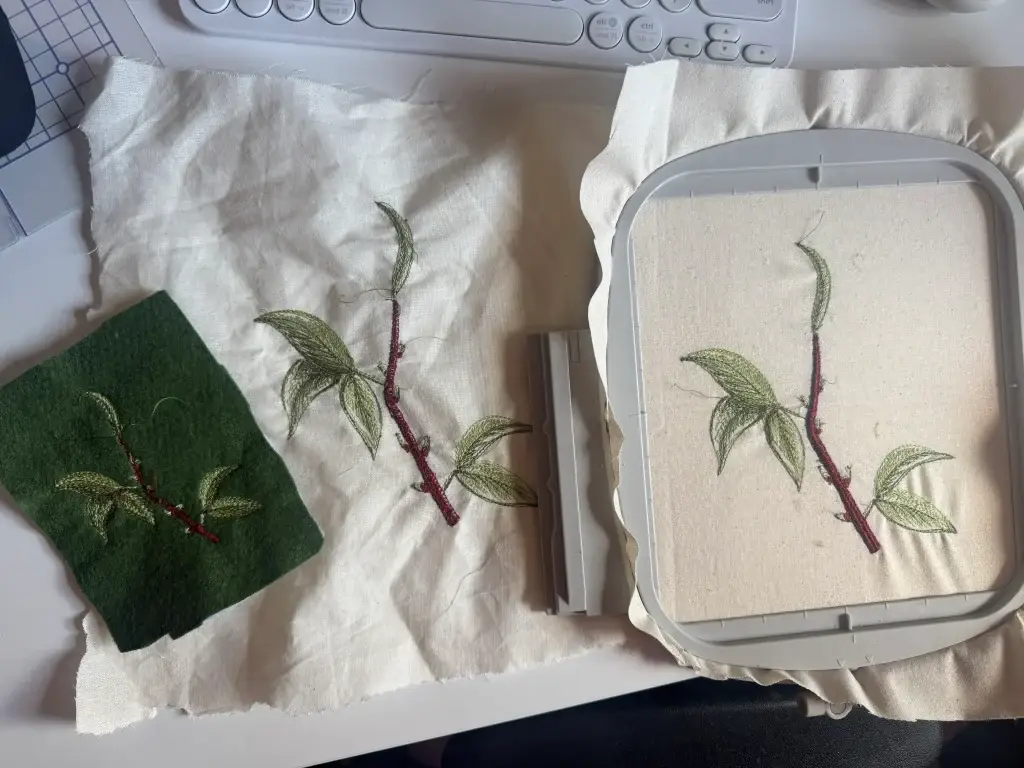
I choose the felt size and colour that will suit the design. Then I loosely baste (fancy word for “sew loosely and roughly”) the felt onto the back of the stabiliser.
Using a drawing, reference photo, or just intuition, I start freehand stitching. This is the most creative part – I let the needle guide me as I build the design. (I’ve even included a video here so you can see the process in action!)
Once the stitching is complete, I remove the design from the hoop and cut around the stabiliser to match the felt.

I trim any loose threads with sharp embroidery scissors and then gently wash the patch under running water to remove the stabiliser.
Once dry, I apply a heat-transfer iron backing, making it easier to iron the patch onto clothes or accessories.
Finally, I cut out the patch, leaving a neat felt border to make sewing it onto fabric simple.
If I’m particularly happy with the patch, I’ll digitise it. This way I can recreate it again and again. More on that in a moment!

Read my How-To Guide here!
Digitising is where I transform a unique freehand patch, into a design my embroidery machine can replicate. It’s an art form in itself, requiring creativity and precision to keep the charm of the original.
The reason is simple: it allows me to recreate the patch multiple times while preserving the essence of the original freehand thread-painted design. While I could make every patch entirely by hand, the cost would be significantly higher due to the time and effort involved.
By digitally replicating the feel of my freehand embroidery, I can offer beautiful, consistent patches at a more accessible price. That said, my high-end denim jackets exclusively feature hand-stitched, freehand patches. These are easy to identify by their higher price point, reflecting the craftsmanship and time invested.
In short, if the price is higher, it’s a freehand original. If it’s lower, it’s a faithful digital replica that still captures the spirit of the handmade design.
Since I’ve already freehand stitched the original design, I understand how the stitches work together. Using my Mac, iPad, and trusty Apple Pencil, I recreate the stitching line of the patch with Premier+2 Create software. I’m replicating the lines I drew with thread, now digitally with my pencil.

To keep the handmade feel, I use sketch-like strokes and only running stitches that mimic my freehand embroidery. I’m not too particular about each stitching as I aim to replicate the charm and irregularities of hand stitching.
Once the design is ready, I upload it to my embroidery machine. I hoop up stabiliser and felt. I position the design. Then, I let the machine do its thing while I watch the magic unfold.
Once the machine embroidery is complete, I carefully assess and compare it to the original freehand design. This process often involves several rounds of refining, tweaking the digital file and re-stitching, until I’m completely satisfied with the result. Only when the patch truly reflects the essence of the original does it move on to the final steps.


After the refinement, I complete the finishing process: washing away the stabiliser, applying a heat-transfer backing, and precisely cutting out the patch.
The result? A faithful replica with its own unique story – rooted in the creativity and craftsmanship of the original freehand embroidery.
Even my machine-replicated patches are far from generic. They start with a moment in nature, evolve through freehand embroidery, and are transformed digitally, all before they reach you.
Use my patches to personalise your clothes and accessories and make a statement! Whether you want to celebrate your love for nature, or you want to add a touch of handmade art to your wardrobe, these patches are for you.
Explore my patches below! If you’d like a custom design or personalised patch, feel free to get in touch!
Since writing this post I have altered the way I create my patches. I now paint my patches on calico and add free motion embroidery – I no longer machine make my patches. The only patches I now make with my embroidery machine are my logo patches. See all my patches in my gallery.